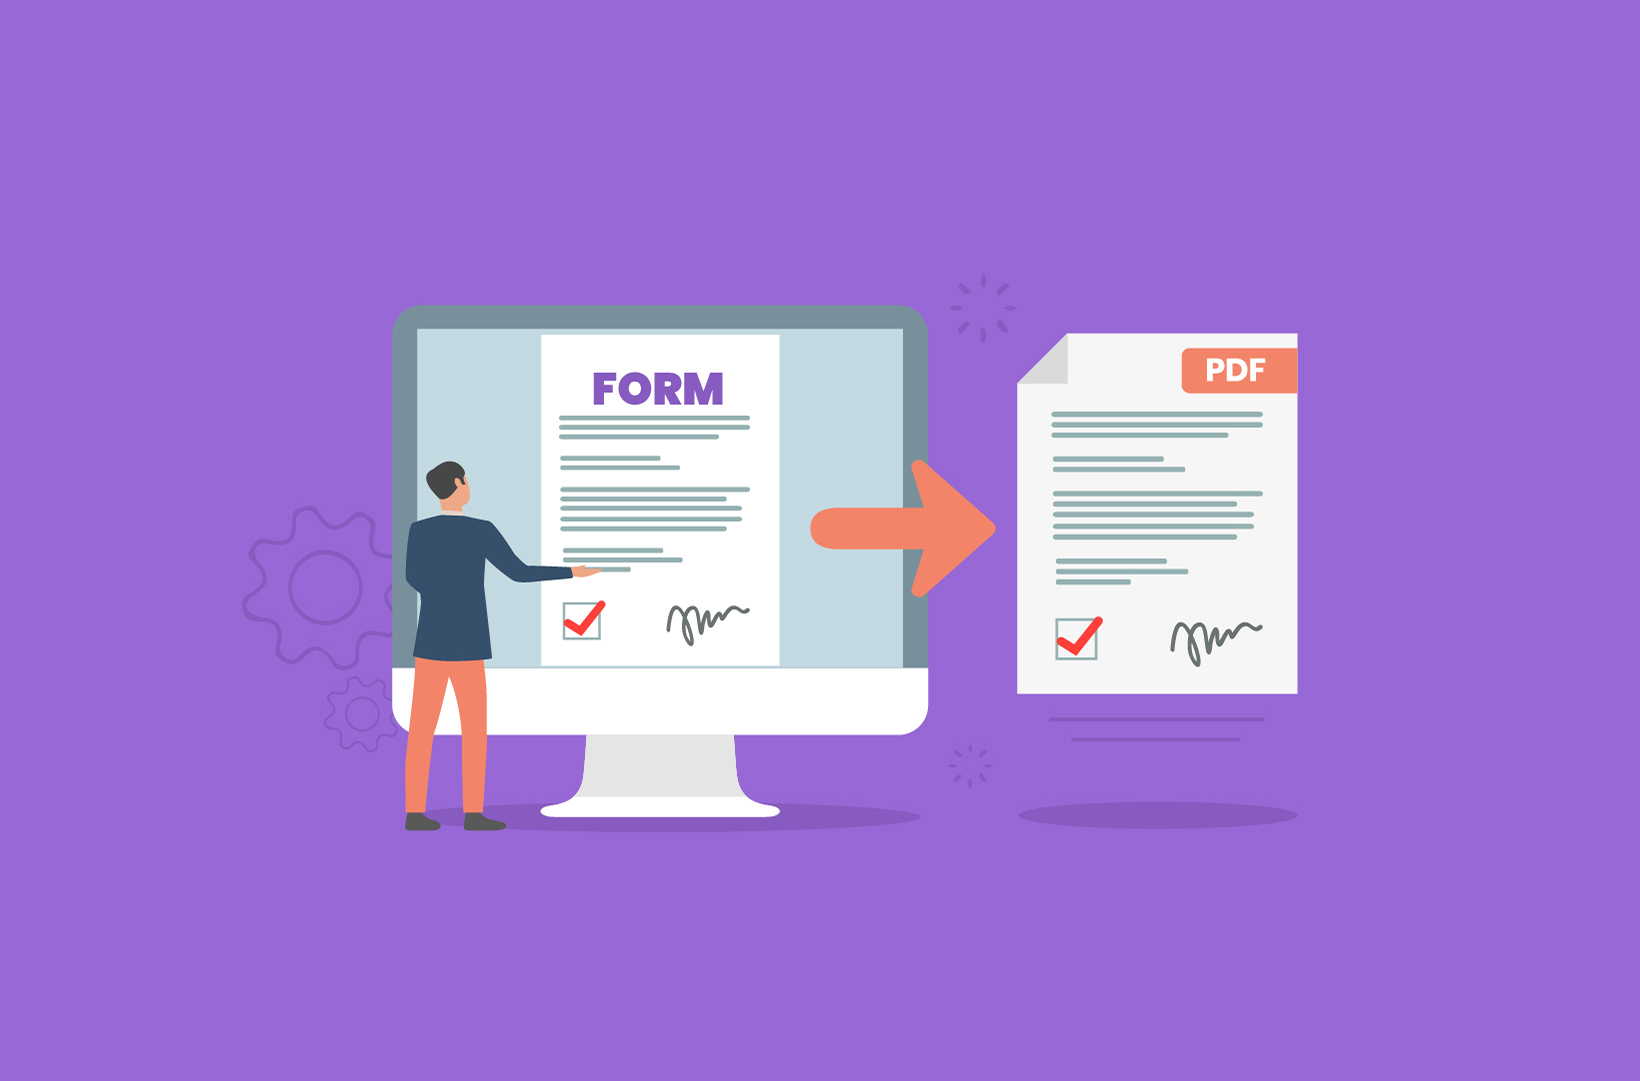
A WordPress PDF generator is great for any situation where you need to receive input on your WordPress website and then generate that data into a finished PDF file – for example, contracts, applications, bureaucratic forms, etc.
If you’re looking for a way to allow site visitors to download PDFs, or automatically generate PDF documents from your WordPress site, we’ve got you covered! This is a complete guide to using Gravity Forms as a flexible WordPress PDF generator for use cases such as:
- Contracts and other legal documents
- Bureaucratic forms
- Applications
- Receipts
- Lead capture
- Information capture through a template
And more! In this tutorial, you’ll learn how to set up a WordPress PDF generator on your website from scratch – in just a few steps.
 The best way to use WordPress as a PDF generator is with a form plugin like Gravity Forms that you pair with Fillable PDFs, a PDF generator plugin extension for Gravity Forms.
By combining these two tools, you’ll be able to create front-end forms to collect data for any type of PDF, from contracts to applications and more. Not just that, you’ll also be able to generate PDFs that maintain your own design/branding, including a watermark if needed.
Fillable PDFs even has the functionality to automatically email the generated PDF to yourself or the person who filled out your form, saving you both the hassle of downloading each new PDF individually.
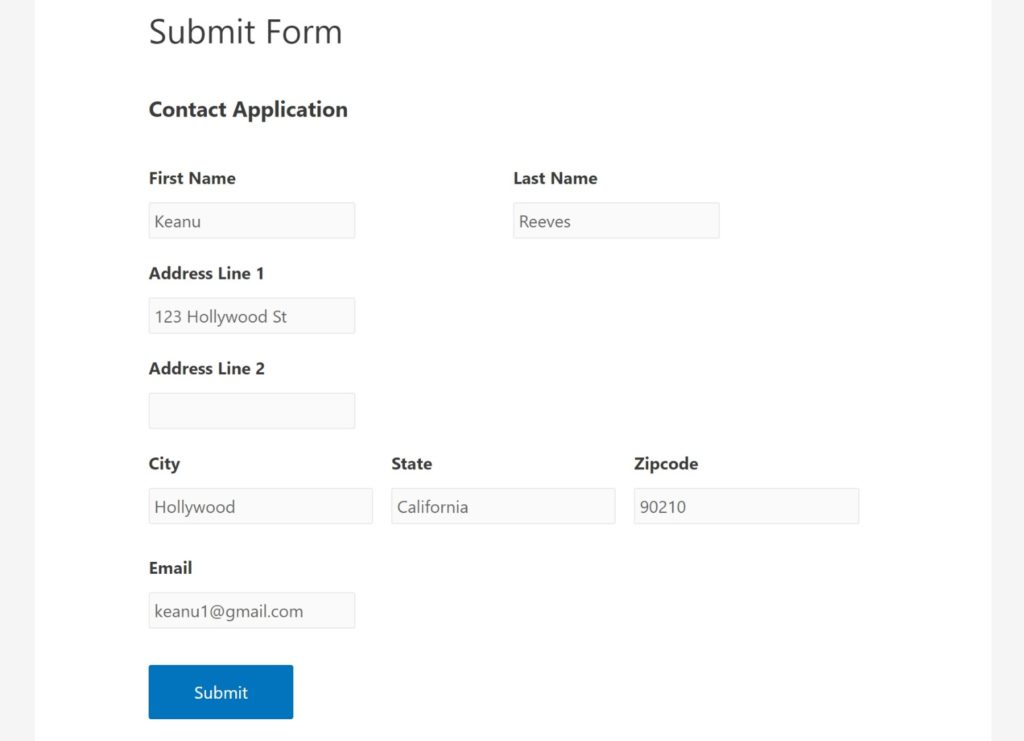
By the end of this post, you’ll be able to take a WordPress PDF generator form like this:
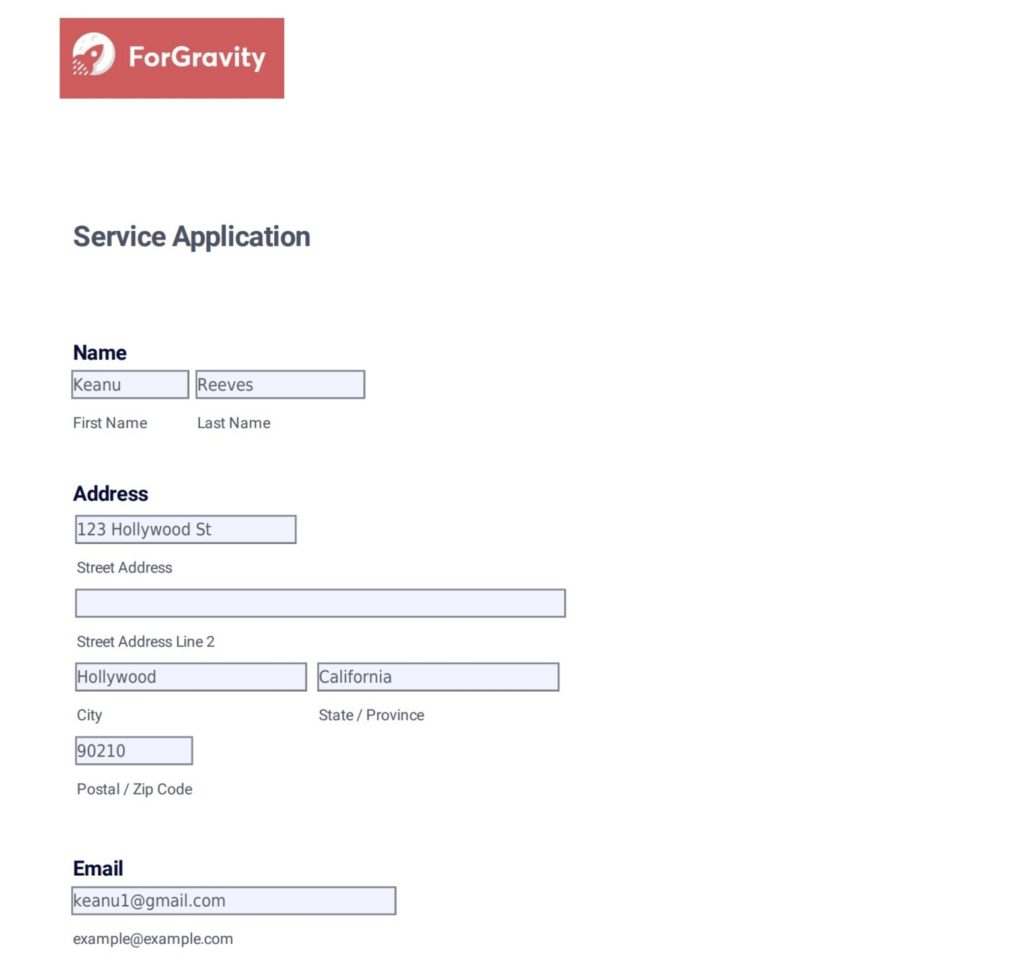
And then turn it into a finished PDF document like this:
Most importantly, you’ll be able to do this without writing a single line of PHP, HTML, CSS, or JavaScript — this is a totally code-free method. This method will also work with all WordPress themes, whether your site is running the Gutenberg page builder or the classic editor.
Why Gravity Forms + Fillable PDFs Make the Best WordPress PDF Generator
By pairing Gravity Forms with the Fillable PDFs plugin, you have 100% control over:
- What information you use to generate a PDF
- How that information looks in the finished PDF file
Your typical workflow might look like this:
- You use the Gravity Forms WordPress plugin to create a front-end form that collects the required data. You can either keep this form private and use it for yourself or for your employees. Or, if your use case calls for it, you can also make the form public and accept submissions from visitors to your site.
- Then, you can automatically generate a PDF file by inserting the data from your form into your PDF document.
- You can create your own PDF template, and your PDF will retain its layout/design even after inserting data from your form. For example, you can add a watermark or your business’s logo.
While you can find other PDF plugins that let you turn a static web page into a PDF, the benefit of using the approach in this post is that you can use WordPress to generate a unique PDF from any form of data – a website, a blog post, an input form etc.
Potential Use Cases for Your WordPress PDF Generator
The great thing about setting up your WordPress PDF generator using this method is that you’ll have total flexibility for how you generate PDFs.
Customization of your PDF generation forms is easy, allowing you to collect as much (or as little) information as needed. Then, you can automatically insert that information into a pre-styled PDF document so that it has a standard PDF format.
Using the right PDF plugin makes a great option for:
- Contracts and other legal documents — you can even use your PDF plugin as a WordPress esignature plugin and have users digitally sign your PDF and include their signature in the finished PDF file.
- Bureaucratic forms — save time on paperwork by making it easier for people to fill out forms. Instead of writing forms by hand, they can enter data in a user-friendly web form and automatically generate a finished PDF.
- Applications — collect as much information as needed from applicants and then turn it all into a PDF.
- Receipts — you can create an eCommerce payment form with Gravity Forms and then generate a PDF document receipt for people who make a purchase. You can even sync your form and PDF generator with WooCommerce.
Because Gravity Forms is so flexible, with powerful compatibility with a range of third-party APIs, you can easily adapt this method to other use cases as well.
How to Set Up Your WordPress PDF Generator
Creating your very own WordPress PDF generator involves 5 steps:
- Create a data collection form using the Gravity Forms WordPress plugin- t his is where you’ll collect the data with which to generate your PDF document.
- Create a fillable PDF file. This is where you can control the template, design, and style for the finished PDF document.
- Map your data collection form to the PDF template.
- Set up email notifications to email the finished PDF files to people (optional – you can also opt for other custom PDF storage/distribution methods).
- Start generating PDFs on WordPress!
Let’s take a closer look at how it’s done.
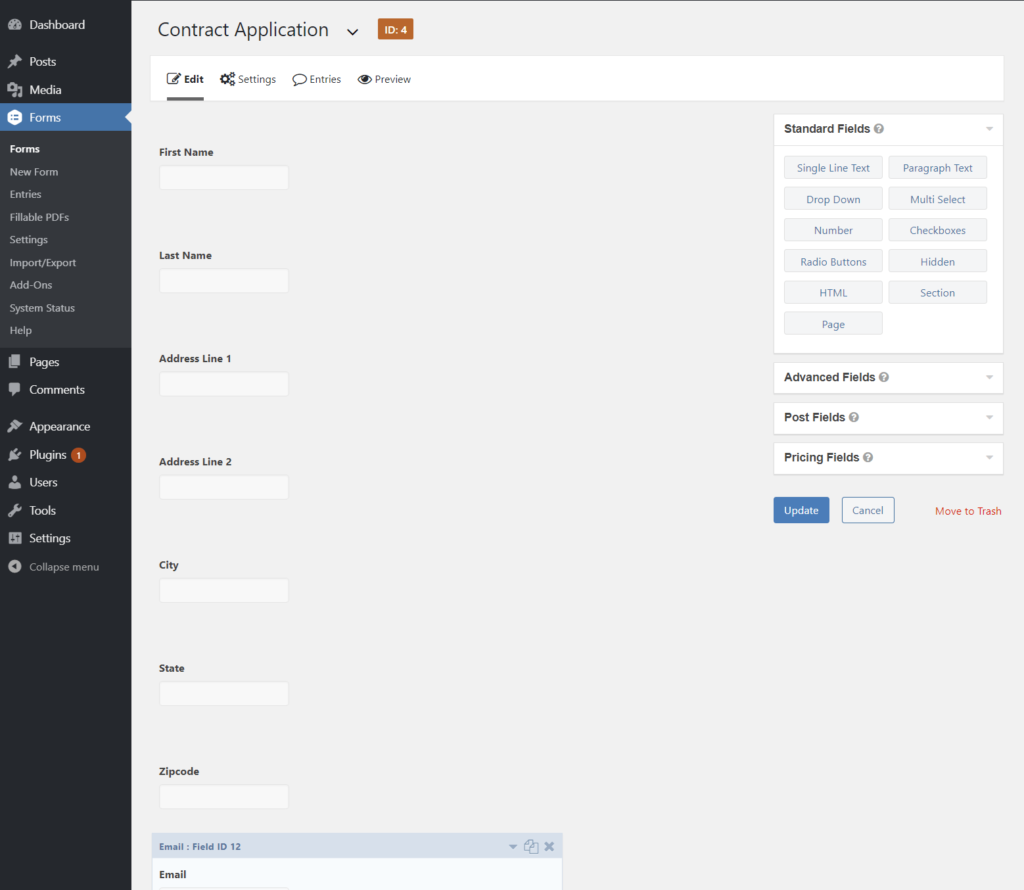
1. Create a Data Collection Form with Gravity Forms
To get started, install and activate the Gravity Forms WordPress plugin. Then, go to Forms → New Form to create a new form.
This is the front-end form where you’ll collect the data that you’ll use to generate a PDF. You’ll want to add form fields for all the data that you want to include in your generated PDF file.
For example, if you want to include someone’s name and address in your PDF, make sure to add fields for both name and address.
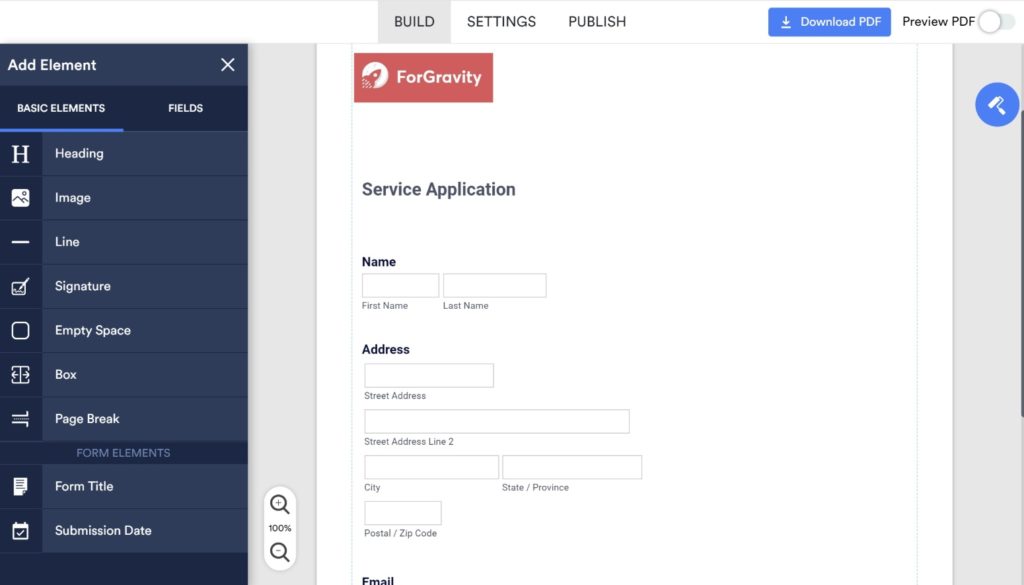
Here’s an example of what it might look like for generating a PDF file from a simple application:
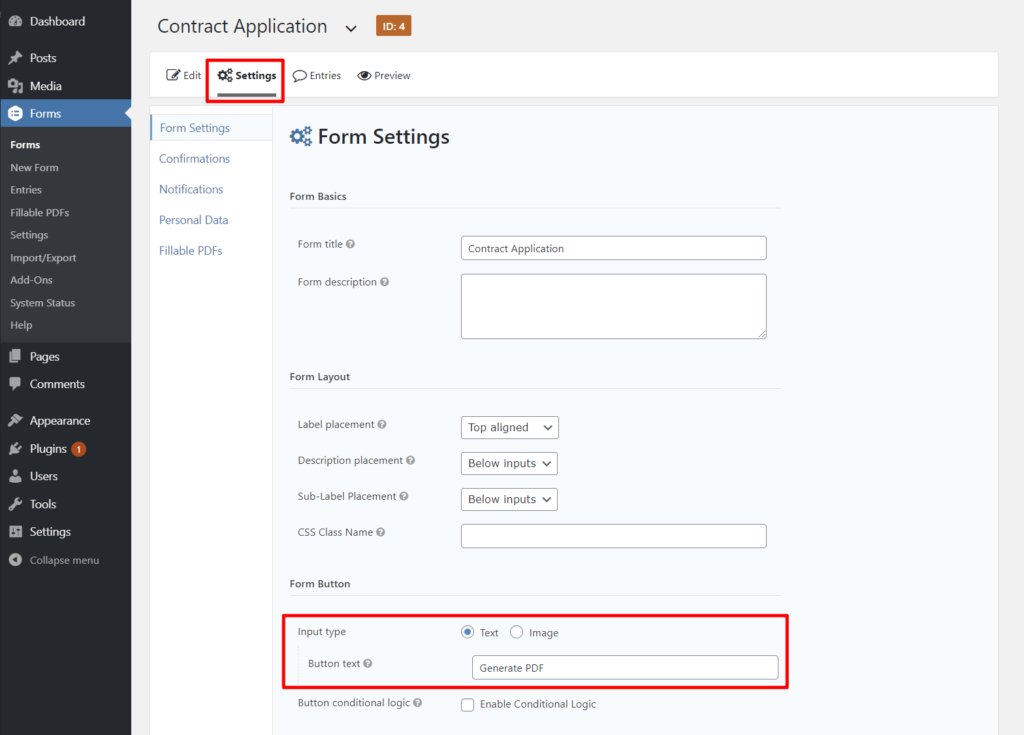
If you want to change the text of the submit PDF button, you can go to the Settings tab in the Gravity Forms backend and look for the Button text field. For example, you can change the text to “Generate PDF”:
2. Create a Fillable PDF File
Next, you need to create the template that you’ll use to generate your PDFs.
You can do this by creating a regular PDF document with “fillable fields”. You’ll be able to insert data from your forms into those fillable fields, which is how you generate the PDF file.
The nice thing about this approach is that you can also include static content that will always stay the same. For example, you could include header text, logos, watermarks, etc.
Your finished PDF documents will retain this formatting — the only thing that will change is the data in your fillable fields.
To create a fillable PDF, you have a few options.
The most flexible solution is to use Adobe Acrobat to design your PDF — you can follow this tutorial to add fillable fields in Adobe Acrobat.
If you want a simpler, cloud-based tool, two good options are:
- JotForm — you can design your PDF file using a simple drag-and-drop interface. The free version includes JotForm branding, though.
- PDFescape — not as user-friendly as JotForm, but it’s free and doesn’t include any branding.
Make sure to include fillable fields for all the data in the form that you created in step #1. You can also feel free to include other text or design elements, and configure other details such as paper size and RTL text settings.
Here’s what it looks like to create a fillable PDF with JotForm:
3. Upload Fillable PDF as PDF Template and Map Fields
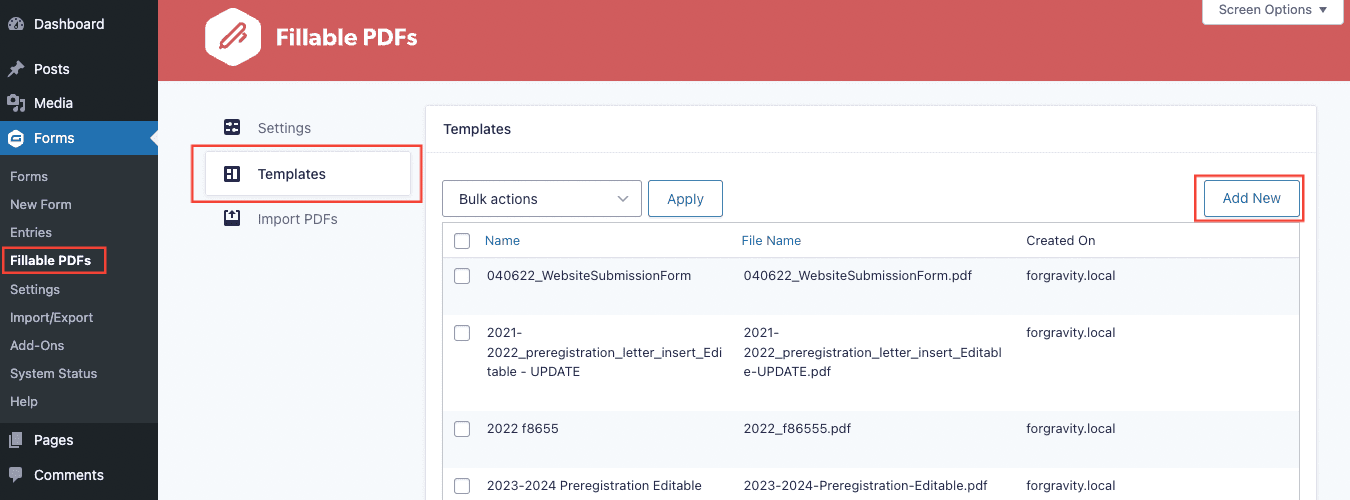
To tell Gravity Forms to generate form submissions into PDFs, you need to install and activate the Fillable PDFs plugin from CosmicGiant.
Next, go to Forms → Fillable PDFs → Templates → Add New:
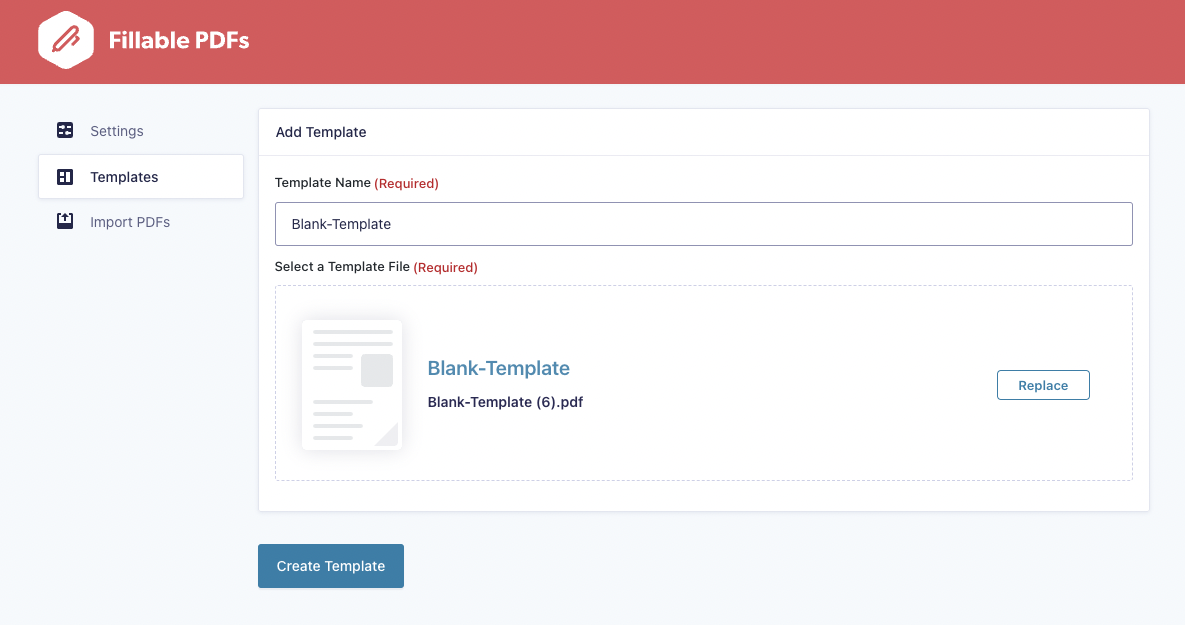
On the next page, give your PDF template a name and either click to browse or drop the fillable PDF file that you created in the previous step into the labeled box. Then, click Create Template:
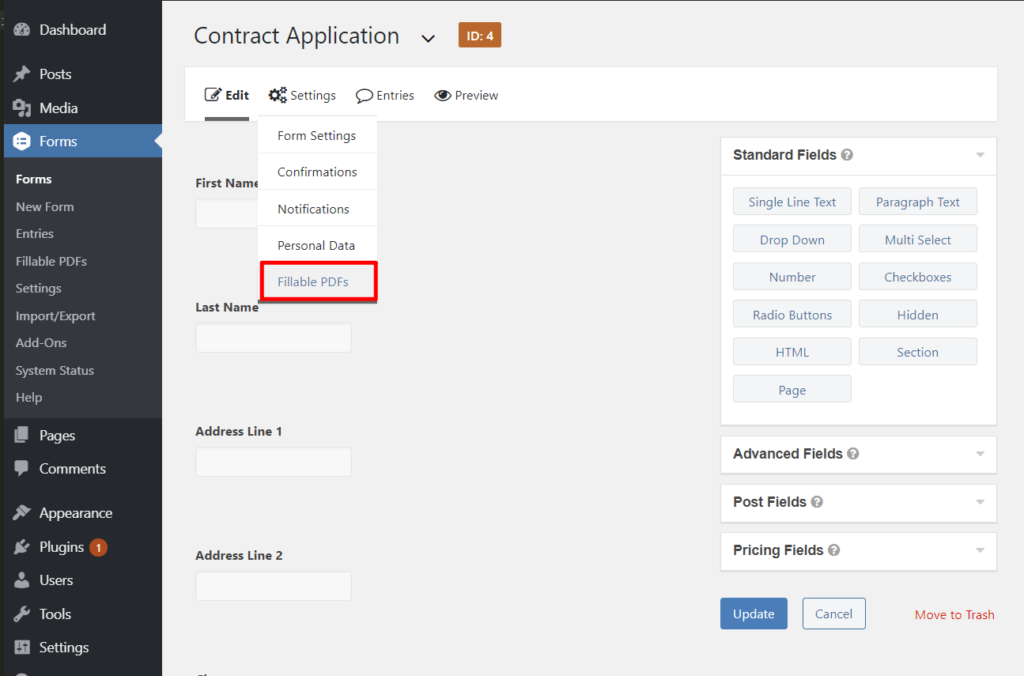
Once you’ve added your PDF template, open the Gravity Forms editor for your PDF generation form. Then, go to Settings → Fillable PDFs:
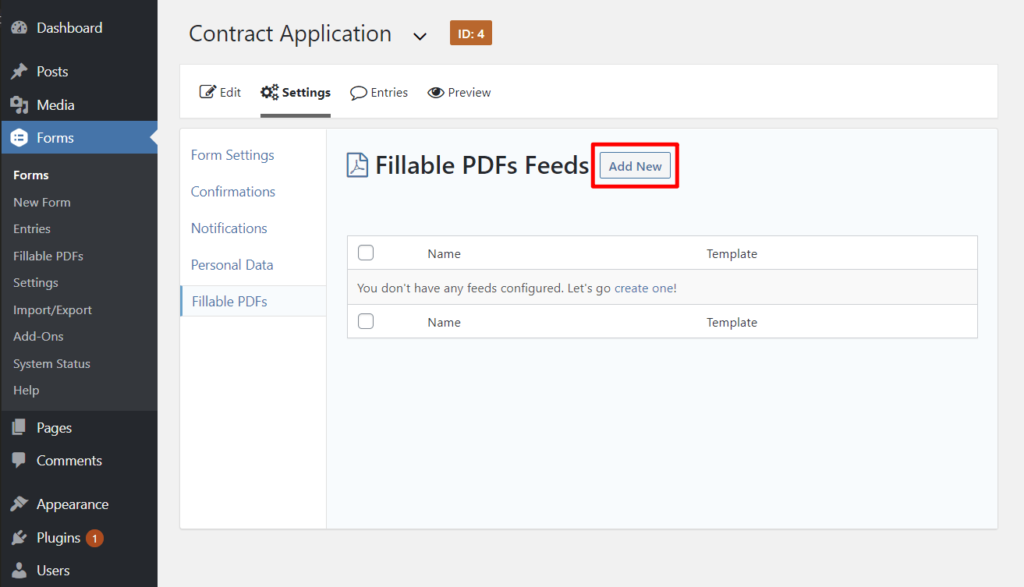
Click Add New to create a new “feed”. A “feed” is what tells Gravity Forms to take new form submissions and use them to generate PDF documents:
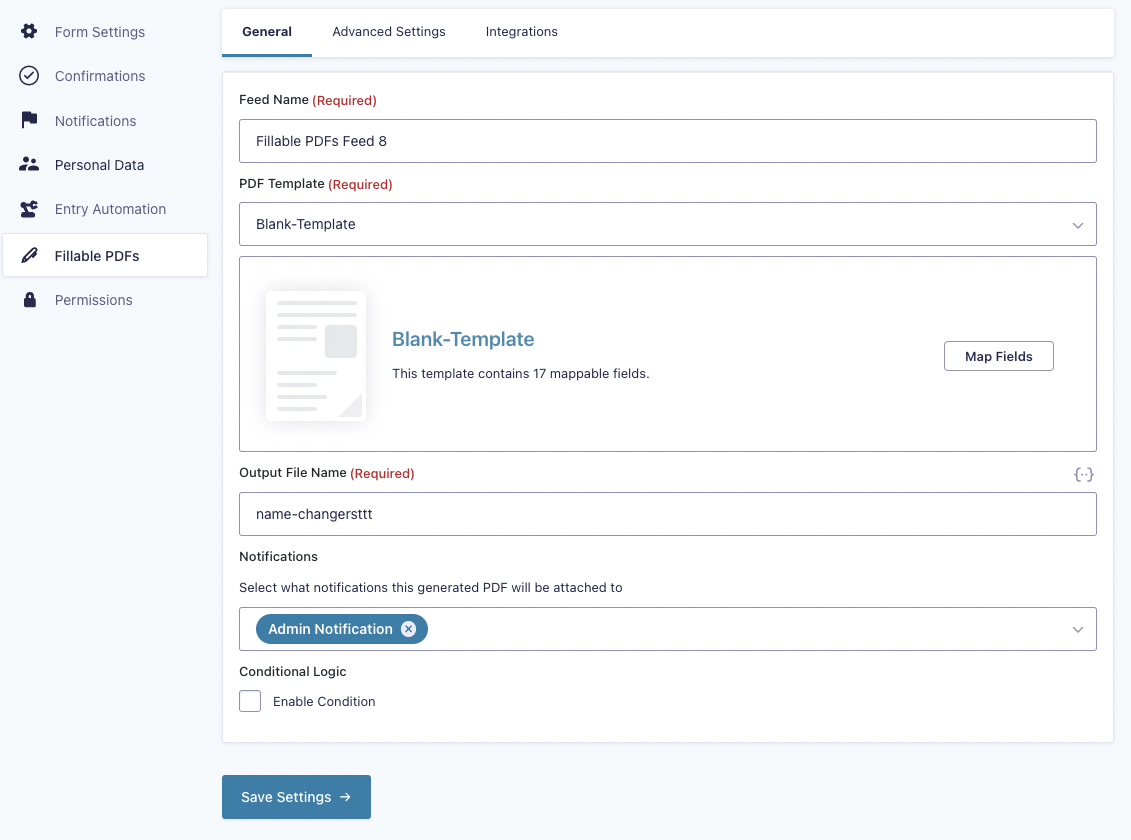
Use the Template drop-down to select the fillable PDF template that you created a moment ago. Then, click the Map Fields button. This allows you to map the form fields in your front-end form to the fillable fields in your PDF template:
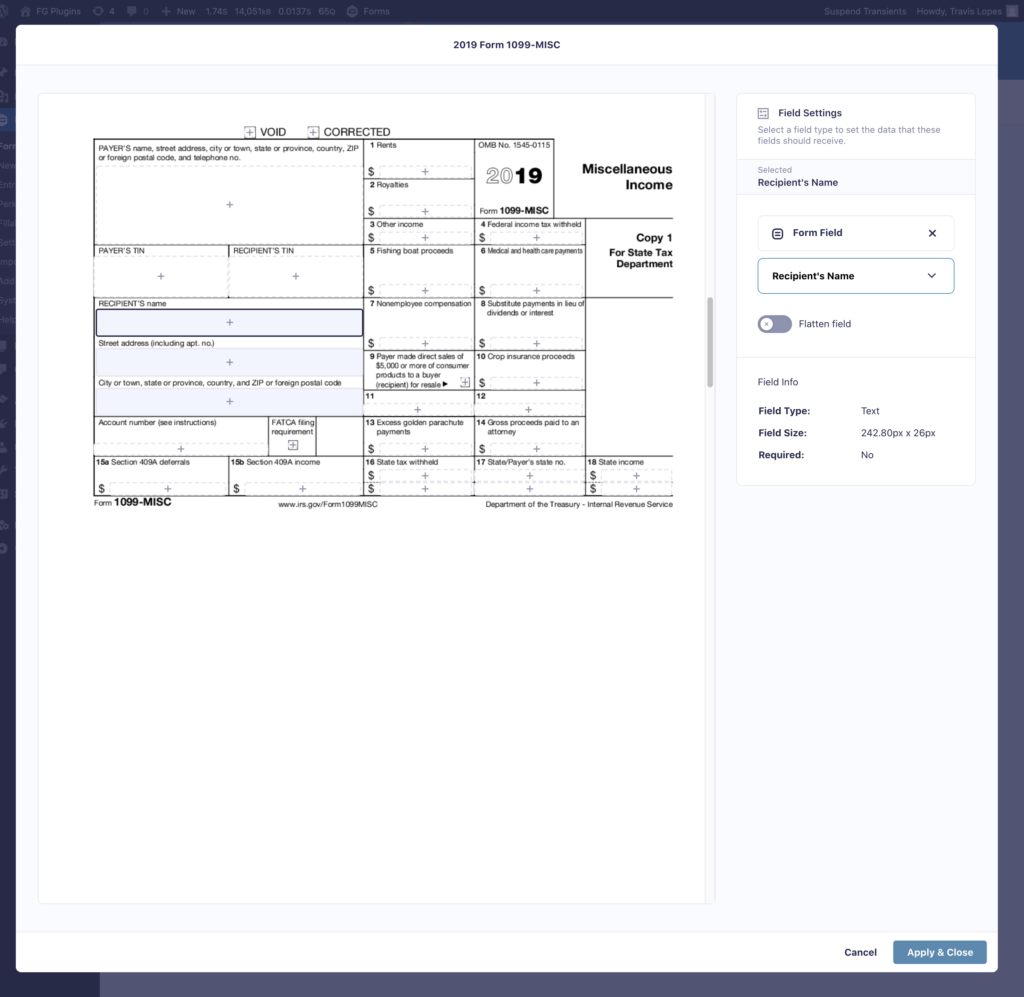
To map fields, all you need to do is click on a fillable field on the live preview of your PDF. Then, you can select a field from the front-end form that you created with Gravity Forms:
Once you’ve mapped all of your fields, you can close the mapper interface and click Save Settings to save your changes.
4. Set Up Email Notifications (Optional)
If you want to automatically email newly-generated PDF files to your email or someone else’s email, you can set up email notifications.
To get started, go to the Notifications tab in the Settings interface of your form to create the basic notification.
You can enter any email address, including the email address that a user entered in your front-end form:

Then, you can go back to the Fillable PDFs section and attach your generated PDF files to your email notification:

5. Start Generating PDF Files on your WordPress website
And that’s it! Your WordPress PDF generator is complete. You (or others) can enter data in your front-end form from Gravity Forms. Then, the Fillable PDFs plugin will use that data to generate a new PDF file when someone submits the front-end form.
If you want to display your finished PDF documents on the front-end of your site in WordPress posts or custom post types, you can use a PDF embedder or PDF viewer WordPress plugin from WordPress.org.
With these plugins (usually available in a free version), you can display PDFs on the front-end using a shortcode. You can also add PDF download buttons using these plugins and index your finished PDFs in Google for SEO.
Get Started With Your WordPress PDF Generator Today
With Gravity Forms and the Fillable PDFs plugin, you can create a flexible WordPress PDF generator that’s ready for any use case.
From contracts to applications to receipts and more, you’ll be able to collect any type of data and then use that data to automatically generate a new PDF file. You can also create your own PDF templates with your brands watermark and design. You can then attach that PDF to an email notification or use an embed PDF plugin to display it on the front-end of your site.
To get started with your own WordPress PDF generator, purchase Fillable PDFs today.